Step-by-Step Tutorial: Springboot Hello Word application with Java 8 and Lombok
Objective
In this tutorial, we will build a Springboot application with Java 8 and Lombok.
Pre-requisites:
- Java JDK 8
- Maven
- IntelliJ IDEA
Github:
The source code can be found at https://github.com/ravasconcelos/springboot-tutorials/tree/main/1-springboot-hello-world .
Hands-on:
Create the project:
Start IntelliJ IDEA and click in Create New Project.

Project settings:
Preferably, select a JDK 8 as "Project SDK". In my case, I am using a JDK 11.
Choose the default starter service URL.

Enter the following information:
- Group: com.ravasconcelos
- Artifact: hello-world
- Type: Maven Project
- Language: Java
- Packaging: Jar
- Java Version: 8
- Name: hello-world
- Description: A Hello World REST Service using Java 8 and Lombok.

Select the libraries you want to be included in the project.
From "Developer Tools", we will choose:
- Spring Boot DevTools
- Lombok
- Spring Configuration Processor

From "Web", we will choose:
- Spring Web Services

Set the Project name and the location. Click in the Finish button.

Project Created:
You will have the Spring Application class created for you.
After the project is created it will look like this.

Creating the Controller and the Model:
Let's first create a package for the controller class.
Right-click the com.ravasconcelos.helloworld package. Select "New", then "Package".
Enter the name "controllers".

Create the controller class right-clicking the "controllers" package.
Select "New" then "Java Class".
Enter HelloWorldController as the class name.

The created class will look like this.

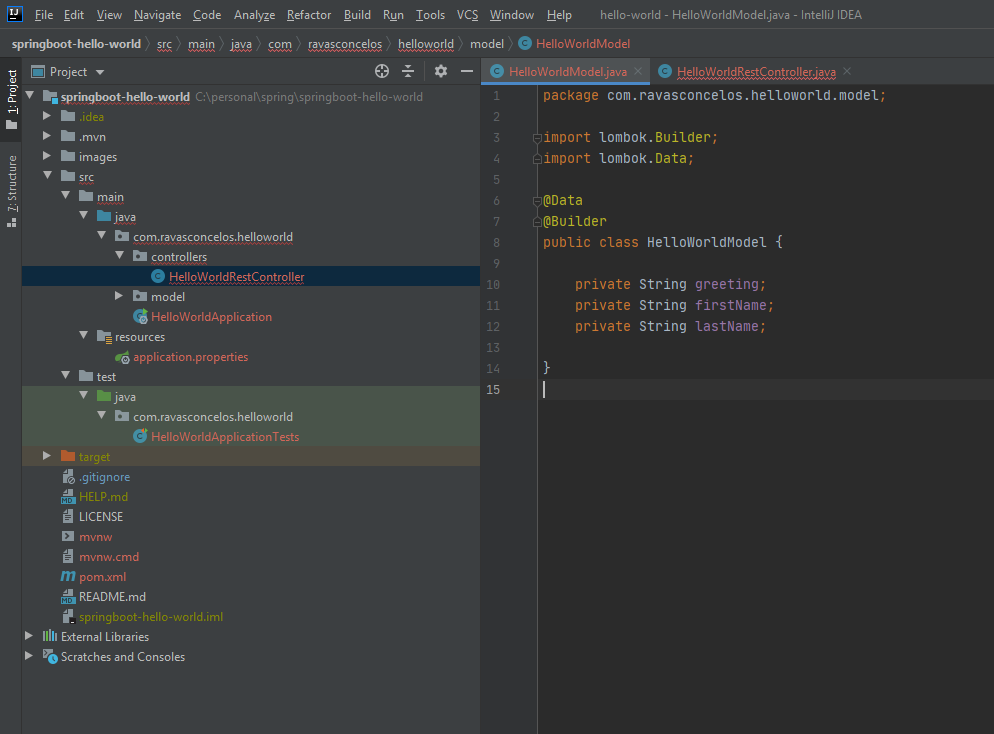
Follow the same steps and create a model class.
Name the package as "model" and the class name as "HelloWorldModel".

Add the Lombok annotations Data and Builder.
Create the fields:
- greeting
- firstName
- lastName
It should look like this.
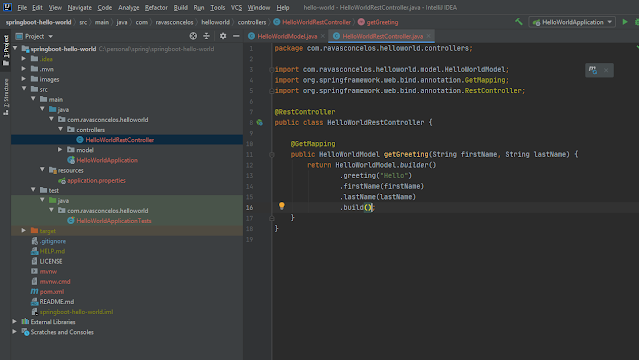
Let's go back to our controller class and add the RestController annotation.
Create the "getGreeting" method and annotate it with "GetMapping".
Return the model class populated with the input parameter and "Hello" as the "greeting".
Running:
Believe it or not we are done.
We can now run the server clicking in the play icon at the top right.

If you see the message log below, everything worked well and you can test it, as the next sub-chapter.

Testing:
Using Postman, curl or your HTTP Client of choice you can send a GET request passing the firstName and the lastName as query parameters.
The response is the JSON payload we have created in the model class.

Conclusion:
Using Springboot you can develop prototypes and real REST-based applications pretty quickly leveraging the Spring framework libraries.
If you found this tutorial useful, please write a comment.
If some of the steps have not worked for you, let me know and I'll do my best to help you.
No comments:
Post a Comment